Move from QuickBooks Desktop to QuickBooks Online: 7 Easy
Table of Contents1. Pre-Migration Checklist Before You Move from QuickBooks Desktop to QuickBooks OnlineChecking Your Total Targets Limit (F2 Key)The 90-Day Account Eligibility Window2. What Data Converts When You Move from QuickBooks Desktop to...

Table of Contents
Deciding to move from QuickBooks Desktop to QuickBooks Online is one of the most critical infrastructure choices a growing business can make. Transitioning your bookkeeping into the cloud provides remote receipt management, automatic bank feed syncing, anywhere mobile accessibility, and real-time collaboration with your CPA without maintaining an in-house server.
However, when you move from QuickBooks Desktop to QuickBooks Online, data migration requires far more precision than a standard file transfer. Because Desktop and Online operate on completely distinct database architectures, rushing the export can trigger out-of-balance reconciliations, mismatched inventory valuation, or lost customer history.
In this comprehensive 2026 tutorial, we provide a complete, field-tested walkthrough so you can safely move from QuickBooks Desktop to QuickBooks Online while preserving 100% financial accuracy across every ledger account.
| ⚡ Quick Summary: How to Move from QuickBooks Desktop to QuickBooks Online in 7 Easy Steps 1. Check File Targets: Press F2 in Desktop to ensure Total Targets are below 750,000. 2. Update Your Software: Update Desktop to the newest release build and create a fresh backup (.QBB). 3. Reconcile Balances: Reconcile all bank feeds, zero out negative inventory, and settle open sales tax items. 4. Trigger Migration Utility: Open Company > Export Your Company File to QuickBooks Online. 5. Link Intuit Credentials: Sign in with your master Intuit ID and select your destination QBO company. 6. Configure Inventory & Dates: Choose whether to import inventory tracking and confirm your FIFO start date. 7. Perform 5-Point Audit: Compare Trial Balance, Balance Sheet, and P&L reports in both platforms to verify matched totals. |
1. Pre-Migration Checklist Before You Move from QuickBooks Desktop to QuickBooks Online
Systematic file preparation is the fundamental key to ensuring you move from QuickBooks Desktop to QuickBooks Online smoothly without mid-process timeouts. Before launching the migration tool, verify these two mandatory technical requirements:
Checking Your Total Targets Limit (F2 Key)
In QuickBooks Desktop, a ‘target’ represents each individual line item on an invoice, bill, check, or journal entry. To determine your company file’s complexity, launch QuickBooks Desktop and press F2 (or Ctrl + 1) to launch the Product Information screen. Check the Total Targets field in the File Information box.
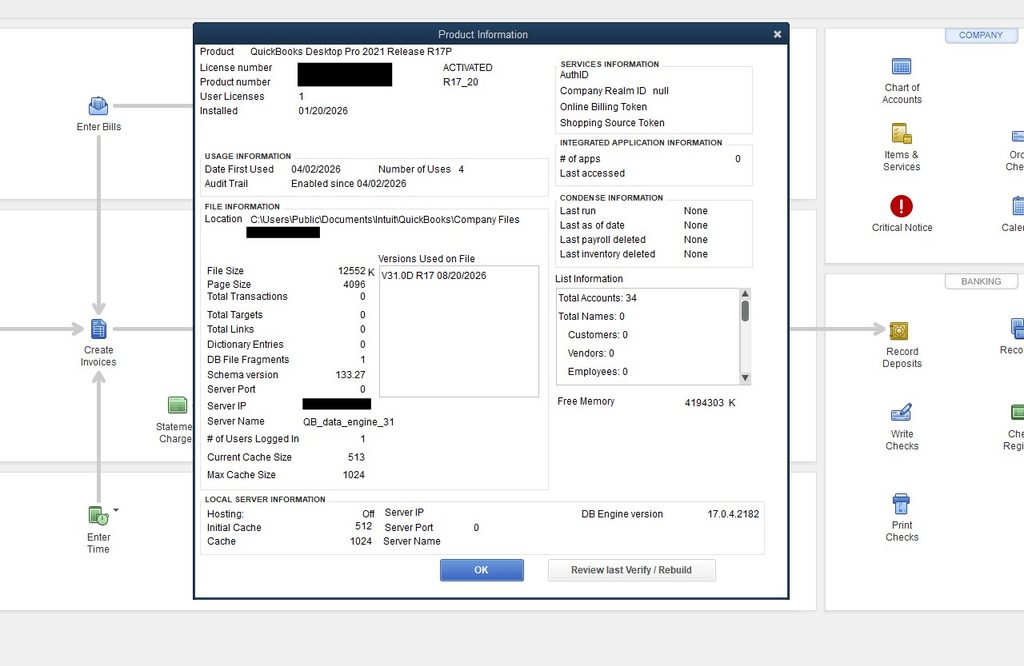
• Under 750,000 Targets: Your file is in the ideal range and will export smoothly using the standard online migration tool.
• 750,000 to 4,000,000 Targets: Transfer is technically supported, but large databases can face prolonged upload times or minor inventory adjustments.
• Over 4,000,000 Targets: Direct online export is disabled by Intuit.
Before exporting, ensure your desktop software is fully up to date by running the latest build of QuickBooks Desktop Pro Plus 2024 to eliminate known conversion bugs. If your company file contains severe database corruption or unresolvable verification errors, reach out to the specialists at Desktop License Customer Support for professional file repair and setup guidance.
The 90-Day Account Eligibility Window
According to the official Intuit migration rules and account eligibility guidelines, data can only be imported into a QuickBooks Online company within the first 90 days of registration (or 180 days if provisioned through an accountant’s ProAdvisor portal). If your target QBO company file is older than 90 days, you must purge existing data or register a clean subscription.
2. What Data Converts When You Move from QuickBooks Desktop to QuickBooks Online
Because Desktop and Online run on completely distinct software frameworks, not every legacy preference converts identically when you move from QuickBooks Desktop to QuickBooks Online. Review this conversion matrix to prepare your team for manual adjustments:
| Feature / Data Type | Migrates to QBO? | Impact & Required Action |
| Chart of Accounts & Balances | Yes (Full) | Transfers cleanly. Sub-accounts and historical balances are preserved. |
| Customer & Vendor Lists | Yes (Full) | Contact details, balances, and transaction history transfer intact. |
| Inventory & Items | Partial (FIFO) | Desktop Average Cost converts to FIFO. Negative inventory must be zeroed first. |
| Historical Paychecks | Converted to Checks | Detailed pay stubs do not migrate. Payroll must be setup fresh in QBO prior to new runs. |
| Custom Report Templates | No | Custom report formats do not migrate; recreate favorite reports using QBO Custom Reports. |
| Memorized Transactions | No | Templates do not convert. Must recreate active automations as Recurring Transactions. |
| Reconciliation History | No | Bank reconciliations reset. Save historical reconciliation reports as PDF before moving. |
If your accounting team relies on customized client reports in QuickBooks Desktop Premier Accountant, ensure you export and print all historical reconciliation PDFs and custom transaction filters before migrating.
3. Step-by-Step Guide: How to Move from QuickBooks Desktop to QuickBooks Online
Follow this battle-tested, 4-step sequence to cleanly move from QuickBooks Desktop to QuickBooks Online without risking database corruption:
Step 1: Clean and Prepare Your Desktop Company File
1. Apply Latest Software Patches: Click Help > Update QuickBooks Desktop > Update Now and install all maintenance releases.
2. Complete Bank Reconciliations: Reconcile all checking, savings, and merchant accounts up to your most recent monthly statement.
3. Clear Pending Balances: Settle suspense accounts, zero out negative inventory quantities, and pay sales tax liabilities.
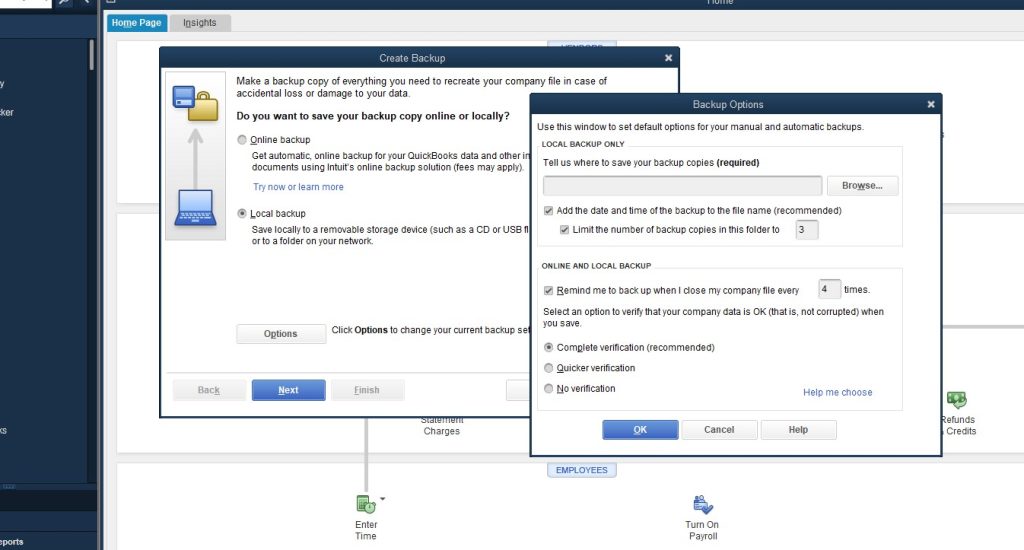
4. Create an Uncompressed Backup: Navigate to File > Back Up Company > Create Local Backup to preserve a restore point before you move from QuickBooks Desktop to QuickBooks Online.
Step 2: Launch the Export Tool in QuickBooks Desktop
Log in to QuickBooks Desktop using your Company Administrator profile. Then, initiate the export tool based on the edition you currently operate:
• For QuickBooks Pro or Premier: Open Company > Export Your Company File to QuickBooks Online.
• For Enterprise Editions: If your business manages large inventories on QuickBooks Desktop Enterprise 2024, press Ctrl + 1 on your keyboard, then press Ctrl + B + Q, and click OK on the confirmation popup.
• For Mac Users: Businesses operating on QuickBooks Desktop Mac Plus 2024 must use File > Export > To QuickBooks Online.
Step 3: Authenticate and Choose Your Destination Company
1. Click Get Started on the migration welcome screen.
2. Input your Intuit Account login credentials.
3. Choose your target QuickBooks Online company from the dropdown selector.
4. If your company tracks inventory, specify your inventory start date for FIFO calculations before you move from QuickBooks Desktop to QuickBooks Online.
Step 4: Upload and Monitor Transfer Status
Click Continue to upload your data to Intuit’s cloud infrastructure. Transfer durations vary from 10 minutes for lean company files up to several hours for multi-gigabyte databases. In the rare event your transfer stalls while you move from QuickBooks Desktop to QuickBooks Online, review the practical diagnostic guides available on the Desktop License QuickBooks Blog and Knowledge Hub to resolve network timeouts quickly.
4. Post-Migration Verification: 5-Point Financial Audit
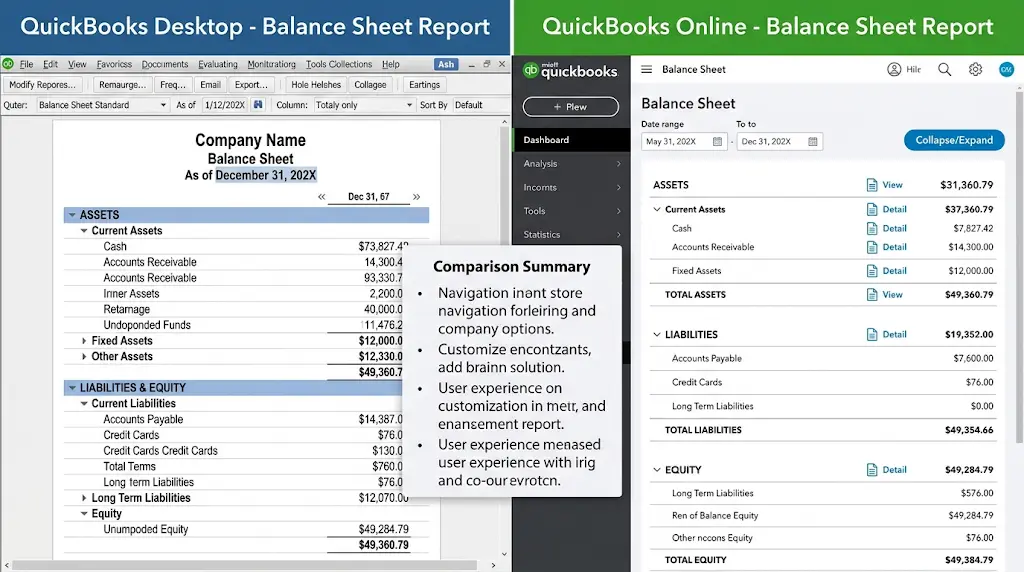
The moment you move from QuickBooks Desktop to QuickBooks Online, you must execute a strict 5-point balance audit before entering new sales receipts or vendor bills. Run matching reports in both Desktop and Online on an Accrual basis for ‘All Dates’:
| Audit Report | Desktop vs. Online Target | Resolution if Mismatched |
| Trial Balance (All Dates) | Total Debits and Credits must match to the exact cent. | Check for uncategorized transaction entries or rounding differences. |
| Balance Sheet (Accrual) | Assets, Liabilities, and Equity balances must align. | Verify Retained Earnings calculation and Opening Balance Equity. |
| Profit and Loss (YTD) | Total Income, COGS, and Expenses must be identical. | Inspect FIFO inventory valuation adjustments and sales tax accounts. |
| A/R & A/P Aging Summaries | Open customer invoices and vendor bills must match. | Ensure customer credit memos and unapplied bill payments migrated. |
| Bank & Credit Card Feeds | Reconnect live bank feeds in QBO (Banking tab). | Do not import duplicate transactions already posted in Desktop. |
Because QuickBooks Online recalculates cost layers under First In, First Out rules, cross-check the FASB accounting standards for inventory valuation to confirm your newly generated FIFO cost of goods sold aligns with standard accounting treatments after you move from QuickBooks Desktop to QuickBooks Online.
5. Essential Post-Migration Configuration Steps
Once you verify your ledger balances after you move from QuickBooks Desktop to QuickBooks Online, finalize your cloud environment settings:
1. Reconnect Bank Feeds: Link your bank accounts under Bookkeeping > Transactions to activate live data streaming without pulling duplicate historical transactions.
2. Configure Sales Tax Center: Set up your automated destination-based sales tax calculations.
3. Define User Access: Go to Settings > Manage Users to assign granular role-based permissions to staff members.
4. Reconnect Ecosystem Apps: Link ecommerce stores, Point of Sale terminals, and billing software directly via the Intuit Developer App Store.
5. Secure Historical Archives: In accordance with AICPA guidelines for accounting record retention, retain your local Desktop installation and .QBB backup files for at least 7 years for audit compliance.
If after reviewing the cloud feature matrix you determine that desktop software offers better reporting depth, perpetual data security, or lower long-term subscription costs for your workflow, you can compare genuine standalone editions in the Desktop License QuickBooks Store or explore our Desktop License Frequently Asked Questions for licensing and installation details.
Frequently Asked Questions (FAQs)
How long does it take to move from QuickBooks Desktop to QuickBooks Online?
The actual data transfer typically takes between 10 and 30 minutes for files under 750,000 targets. However, comprehensive preparation, file cleanup, and post-migration report reconciliation usually take 2 to 4 hours in total.
Will switching to QuickBooks Online delete my QuickBooks Desktop file?
No. The migration process creates a copy of your data and uploads it to the cloud. Your local QuickBooks Desktop file remains completely intact on your computer and can be accessed as a read-only historical record.
Why is my inventory value different after moving to QuickBooks Online?
QuickBooks Desktop allows the Average Cost inventory method, whereas QuickBooks Online strictly uses First In, First Out (FIFO). When your data converts, QBO recalculates asset values and Cost of Goods Sold based on FIFO cost layers, which may create a slight opening balance adjustment.
Can I migrate QuickBooks Enterprise files to QuickBooks Online?
Yes. QuickBooks Enterprise files can be exported using the keyboard shortcut Ctrl + 1 followed by Ctrl + B + Q on the Product Information screen. If your Enterprise file exceeds 4,000,000 targets, you must condense historical data first.
What happens to my historical payroll data when I convert to Online?
Historical paychecks migrate as general bank checks to preserve financial report accuracy, but detailed pay stubs and tax liability forms do not transfer to QBO Payroll. You will need to enter year-to-date payroll summaries if setting up QuickBooks Online Payroll mid-year.
Can I undo a QuickBooks Online migration if I make a mistake?
If your QuickBooks Online account is less than 60 days old, you can purge all data (Settings > Purge Company Data) and re-import a clean copy from QuickBooks Desktop. After 60 days, you must cancel the company subscription and create a new account to re-import.
Conclusion: Moving Forward with QuickBooks Online
Knowing how to safely move from QuickBooks Desktop to QuickBooks Online gives your business powerful capabilities: anywhere cloud access, automated bank reconciliations, and seamless accountant collaboration. By auditing target limits before you begin, executing the export methodically, and performing a rigorous 5-point balance sheet verification, you achieve a frictionless migration with 100% financial accuracy.
Whether you choose to move from QuickBooks Desktop to QuickBooks Online or continue optimizing your existing desktop software, visit DesktopLicense.com for genuine software editions, licensing support, and expert business accounting guidance.
Compare current Desktop licenses
Review platform, version year, license type, and included users before ordering.